There’s a tool in the PC programming world that nobody would live without, but almost nobody in the PLC or Automation World uses: version control systems. Even most PC programmers shun version control at first, until someone demonstrates it for them, and then they’re hooked. Version control is great for team collaboration, but most individual programmers working on a project use it just for themselves. It’s that good. I decided since most of you are in the automation industry, I’d give you a brief introduction to my favourite version control system: Mercurial.
It’s called “Mercurial” and always pronounced that way, but it’s frequently referred to by the acronym “Hg”, referring to the element “Mercury” in the periodic table.
Mercurial has a lot of advantages:
- It’s free. So are all of the best version control systems actually. Did I mention it’s the favourite tool of PC programmers? Did I mention PC programmers don’t like to pay for stuff? They write their own tools and release them online as open source.
- It’s distributed. There are currently two “distributed version control systems”, or DVCS, vying for supremacy: Hg and Git. Distributed means you don’t need a connection to the server all the time, so you can work offline. This is great if you work from a laptop with limited connectivity, which is why I think it’s perfect for automation professionals. Both Hg and Git are great. The best comparison I’ve heard is that Hg is like James Bond and Git is like MacGyver. I’ll let you interpret that…
- It has great tools. By default it runs from the command line, but you never have to do that. I’ll show you TortoiseHg, a popular Windows shell that lets you manage your versioned files inside of a normal Windows Explorer window. Hg also sports integration into popular IDEs.
I’ll assume you’ve downloaded TortoiseHg and installed it. It’s small and also free. In fact, it comes bundled with Mercurial, so you only have to install one program.
Once that’s done, follow me…
First, I created a new Folder on my desktop called My New Repository:

Now, right click on the folder. You’ll notice that TortoiseHg has added a new submenu to your context menu:
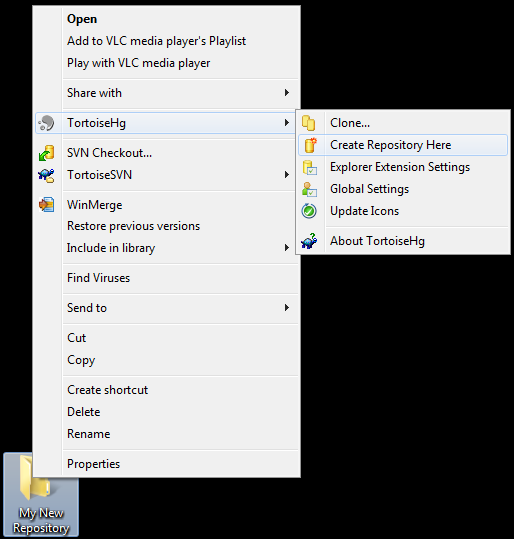
In the new TortoiseHg submenu, click on “Create Repository Here”. What’s a Repository? It’s just Hg nomenclature for a folder on your computer (or on a network drive) that’s version controlled. When you try to create a new repository, it asks you this question:
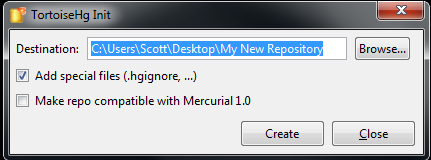
Just click the Create button. That does two things. It creates a sub-folder in the folder you right-clicked on called “.hg”. It also creates a “.hgignore” file. Ignore the .hgignore file for now. You can use it to specify certain patterns of files that you don’t want to track. You don’t need it to start with.
The .hg folder is where Mercurial stores all of its version history (including the version history of all files in this repository, including all files in all subdirectories). This is a particularly nice feature about Mercurial… if you want to “un-version” a directory, you just delete the .hg folder. If you want to make a copy of a repository, you just copy the entire repository folder, including the .hg subdirectory. That means you’ll get the entire history of all the files. You can zip it up and send it to a friend.
Now here’s the cool part… after you send it to your friend, he can make a change to the files while you make changes to your copy, you can both commit your changes to your local copies, and you can merge the changes together later. (The merge is very smart, and actually does a line-by-line merge in the case of text files, CSV files, etc., which works really well for PC programming. Unfortunately if your files use a proprietary binary format, like Excel or a PLC program, Mercurial can’t merge them, but will at least track versions for you. If the vendor provides a proprietary merge tool, you can configure Mercurial to open that tool to merge the two files.)
Let’s try an example. I want to start designing a new automation cell, so I’ll just sketch out some rough ideas in Notepad:
Line 1
  - Conveyor
    - Zone 1
    - Zone 2
    - Zone 3
  - Robot
    - Interlocks
    - EOAT
    - Vision System
  - Nut Feeder
I save it as a file called “Line 1.txt” in my repository folder. At this point I’ve made changes to the files in my repository (by adding a file) but I haven’t “committed” those changes. A commit is like a light-weight restore point. You can always roll back to any commit point in the entire history of the repository, or roll forward to any commit point. (You can also “back out” a single commit even if it was several changes ago, which is a very cool feature.) It’s a good idea to commit often.
To commit using TortoiseHg, just right click anywhere in your repository window and click the “Hg Commit…” menu item in the context menu. You’ll see a screen like this:
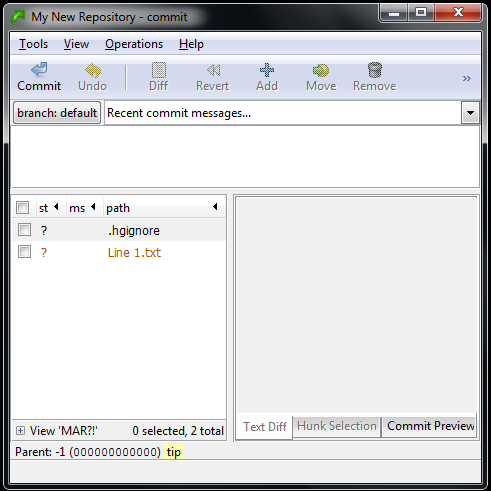
It looks a bit weird, but it’s showing you all the changes you’ve made since your “starting point”. Since this is a brand new repository, your starting point is just an empty directory. Once you complete this commit, you’ll have created a new starting point, and it will track all changes after the commit. However, you can move your starting point back and forth to any commit point by using the Update command (which I’ll show you later).
The two files in the Commit dialog box show up with question marks beside them. That means it knows that it hasn’t seen these files before, but it’s not sure if you want to include them in the repository. In this case you want to include both (notice that the .hgignore file is also a versioned file in the repository… that’s just how it works). Right click on each one and click the Add item from the context menu. You’ll notice that it changes the question mark to an “A”. That means the file is being added to the repository during this commit.
In the box at the top, you have to enter some description of the change you’re making. In this case, I’ll say “Adding initial Line 1 layout”. Now click the Commit button in the upper left corner. That’s it, the file is now committed in the repository. Close the commit window.
Now go back to your repository window in Windows Explorer. You’ll notice that they now have green checkmark icons next to them (if you’re using Vista or Windows 7, sometimes you have to go into or out of the directory, come back in, and press F5 to see it update):

The green checkmark means the file is exactly the same as your starting point. Now let’s try editing it. I’ll open it and add a Zone 4 to the conveyor:
Line 1
  - Conveyor
    - Zone 1
    - Zone 2
    - Zone 3
    - Zone 4
  - Robot
    - Interlocks
    - EOAT
    - Vision System
  - Nut Feeder
The icon in Windows Explorer for my “Line 1.txt” file immediately changed from a green checkmark to a red exclamation point. This means it’s a tracked file and that file no longer matches the starting point:

Notice that it’s actually comparing the contents of the file, because if you go back into the file and remove the line for Zone 4, it will eventually change the icon back to a green checkmark!
Now that we’ve made a change, let’s commit that. Right click anywhere in the repository window again and click “Hg Commit…”:
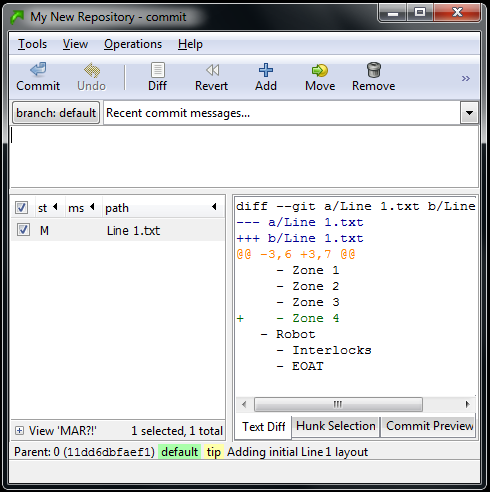
Now it’s showing us that “Line 1.txt” has been Modified (see the M beside it) and it even shows us a snapshot of the change. The box in the bottom right corner shows us that we added a line for Zone 4, and even shows us a few lines before and after so we can see where we added it. This is enough information for Mercurial to track this change even if we applied this change in a different order than other subsequent changes. Let’s finish this commit, and then I’ll give you an example. Just enter a description of the change (“Added Zone 4 to Conveyor”) and commit it, then close the commit window.
Now right-click in the repository window and click on Hg Repository Explorer in the context menu:
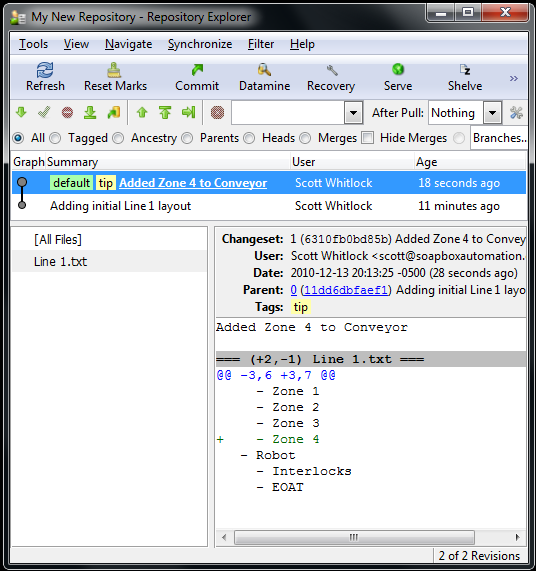
This is showing us the entire history of this repository. I’ve highlighted the last commit, so it’s showing a list of files that were affected by that commit, and since I selected the file on the left, it shows the summary of the changes for that file on the right.
Now for some magic. We can go back to before the last commit. You do this by right-clicking on the bottom revision (that says “Adding initial Line 1 layout”) and selecting “Update…” from the context menu. You’ll get a confirmation popup, so just click the Update button on that. Now the bottom revision line is highlighted in the repository explorer meaning the old version has become your “starting point”. Now go and open the “Line 1.txt” file. You’ll notice that Zone 4 has been removed from the Conveyor (don’t worry if the icons don’t keep up on Vista or Win7, everything is working fine behind the scenes).
Let’s assume that after the first commit, I gave a copy of the repository to someone, (so they have a copy without Zone 4), and they made a change to the same file. Maybe they added some detail to the Nut Feeder section:
Line 1
  - Conveyor
    - Zone 1
    - Zone 2
    - Zone 3
  - Robot
    - Interlocks
    - EOAT
    - Vision System
  - Nut Feeder
    - 120VAC, 6A
Then they committed their change. Now, how do their changes make it back into your repository? That’s by using a feature called Synchronize. It’s pretty simple if you have a copy of both on your computer, or if each of you have a copy, and you also have a “master” copy of the repository on the server, and you can each see the copy on the server. What happens is they “Push” their changes to the server copy, and then you “Pull” their change over to your copy. (Too much detail for this blog post, so I’ll leave that to you as an easy homework assignment). What you’ll end up with, when you look at the repository explorer, is something like this:
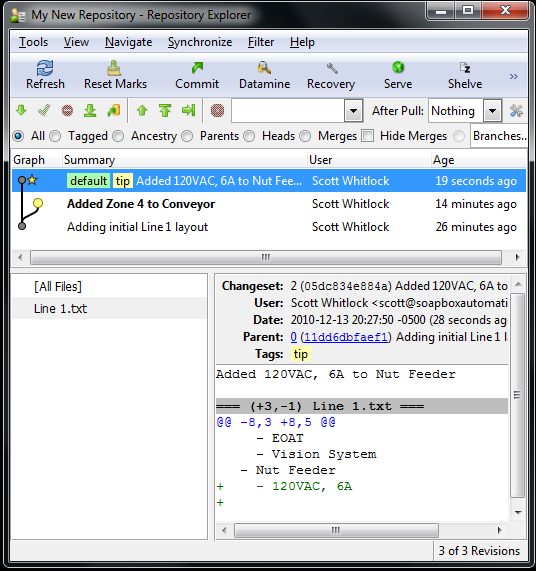
You can clearly see that we have a branch. We both made our changes to the initial commit, so now we’ve forked it. This is OK. We just have to do a merge. In a distributed version control system, merges are normal and fast. (They’re fast because it does all the merge logic locally, which is faster than sending everything to a central server).
You can see that we’re still on the version that’s bolded (“Added Zone 4 to Conveory”). The newer version, on top, is the one with the Nut Feeder change from our friend. In order to merge that change with ours, just right click on their version and click “Merge With…” from the context menu. That will give you a pop-up. It should be telling you, in a long winded fashion, that you’re merging the “other” version into your “local” version. That’s what you always want. Click Merge. It will give you another box with the result of the merge, and in this case it was successful because there were no conflicts. Now click Commit. This actually creates a new version in your repository with both changes, and then updates your local copy to that merged version. Now take a look at the “Line 1.txt” file:
Line 1
  - Conveyor
    - Zone 1
    - Zone 2
    - Zone 3
    - Zone 4
  - Robot
    - Interlocks
    - EOAT
    - Vision System
  - Nut Feeder
    - 120VAC, 6A
It has both changes, cleanly merged into a single file. Cool, right!?
What’s the catch? Well, if the two changes are too close together, it opens a merge tool where it shows you the original version before either change, the file with one change applied, the file with the other change applied, and then a workspace at the bottom where you can choose what you want to do (apply one, the other, both, none, or custom edit it yourself). That can seem tedious, but it happens rarely if the people on your project are working on separate areas most of the time, and the answer of how to merge them is usually pretty obvious. Sometimes you actually have to pick up the phone and ask them what they were doing in that area. Since the alternative is one person overwriting someone else’s changes wholesale, this is clearly better.
Mercurial has a ton of other cool features. You can name your branches different names. For example, I keep a “Release” branch that’s very close to the production code where I can make “emergency” fixes and deploy them quickly, and then I have a “Development” branch where I do major changes that take time to stabilize. I continuously merge the Release branch into the Development branch during development, so that all bug fixes make it into the new major version, but the unstable code in the Development branch doesn’t interfere with the production code until it’s ready. I colour-code these Red and Blue respectively so you can easily see the difference in the repository explorer.
I use the .hgignore file to ignore my active configuration files (like settings.ini, for example). That means I can have my release and development branches in two different folders on my computer, and each one has a different configuration file (for connecting to different databases, or using different file folders for test data). Mercurial doesn’t try to add or merge them.
It even has the ability to do “Push” and “Pull” operations over HTTP, or email. It has a built-in HTTP server so you can turn your computer into an Hg server, and your team can Push or Pull updates to or from your repository.
I hope this is enough to whet your appetite. If you have questions, please email me. Also, you can check out this more in-depth tutorial, though it focuses on the command-line version: hginit.