Author Archives: Scott Whitlock

About Scott Whitlock

I'm Scott Whitlock, an "automation enthusiast". By day I'm a PLC and .NET programmer at ETBO Tool & Die Inc., a manufacturer.

Announcing: the TwinCAT 3 Tutorial

Some of you may have noticed the new section on this site: TwinCAT 3 Tutorial.

I’ll be building this over the next several weeks or months. I’m working on making it more detailed than the RSLogix 5000 Tutorial.

Rather than being an introduction to PLCs, I assume most readers are coming to the new tutorial with some automation experience and they really want to know what this new technology can do for them. I won’t be touching on every single feature of TwinCAT 3, but I certainly want to touch on most of the common ones, and particularly some advanced features that really set TwinCAT 3 apart from traditional PLCs.

As always I greatly appreciate any comments you have. Please send them to my email address (which you can find on the About page).

Sending a Fanuc Robot’s Position to the PLC

This information is for a Fanuc R30-iA, RJ3-iA or RJ3-iB controller but might work with other ones.

If you’re looking for a way to send the robot world TCP position (X, Y, Z, W, P, R) over to the PLC, it’s not actually that difficult. The robot can make the current joint and world position available in variables, and you can copy them to a group output in a background logic task. There is one caveat though: the values only update when you’re running a program. They don’t update while jogging. However, there is a work-around for this too.

First you should make sure that the feature to copy the position to variables is enabled. To get to the variables screen, use MENU, 0 (Next), 6 (System), F1 (Type), Variables.

Find this variable and set it to 1 (or True): $SCR_GRP[1].$m_pos_enb

The name of that variable is Current position from machine pulse

Now create a new robot program, and in it write the following:


GO[1:X POS]=($SCR_GRP[1].$MCH_POS_X*10)
GO[2:Y POS]=($SCR_GRP[1].$MCH_POS_Y*10)
GO[3:Z POS]=($SCR_GRP[1].$MCH_POS_Z*10)
GO[4:W ANG]=($SCR_GRP[1].$MCH_POS_W*100)
GO[5:P ANG]=($SCR_GRP[1].$MCH_POS_P*100)
GO[6:R ANG]=($SCR_GRP[1].$MCH_POS_R*100)

Note that I’ve multiplied the X, Y, and Z positions by 10, so you will have to divide by 10 in your PLC. Likewise I multiplied the W, P, and R angles by 100, so divide by 100 in the PLC.

To run this program in the background, use MENU, 6 (Setup), F1 (Type), 0 (Next), BG Logic. Configure it to run your new program as a background task.

Obviously you need to send these group outputs to the PLC. Ethernet/IP is great for this, but you can use hardwired interlocks too. You need to make sure that you have enough bits to handle the full range of motion. A 16-bit integer should work pretty well for all of these. Note that the robot will happily send negative numbers to a group output as two’s complement, so make sure you map the input to the PLC as a signed 16-bit integer (a.k.a. INT in most PLCs). For the X, Y, and Z positions, a 16-bit integer will give you from +3276.7 mm to -3276.8 mm of total range. For the W, P, and R angles you’ll get +327.67 deg to -327.68 deg. For most applications this is good (remember this is TCP, not joint angles). Please check that these are suitable though.

As I said, these numbers don’t update while you’re jogging, and won’t update until the robot starts a move in a program. One little trick is to do a move to the current position at the start of your program:


PR[100:SCRATCH]=LPOS
J PR[100:SCRATCH] 10% FINE

This starts sending the position without moving the robot. In my programs I typically enter a loop waiting for an input from the PLC, and inside this loop I turn a DO bit on and off. The PLC detects this as a “ready for command” heartbeat, and as long as the PLC sees this pulsing, then it knows the program is running and the position data is valid.

Another trick you can use is to detect when the robot has been jogged:


DO[n]=$MOR_GRP[1].$jogged

The name of this variable is Robot jogged. The description from the manual is: “When set to TRUE,the robot has been jogged since the last program motion. Execution of any user program will reset the flag.”

That’s how you get the world position of the TCP into the PLC. If you just want joint angles, you can use $SCR_GRP[1].$MCH_ANG[n] as the variable, where “n” is the joint number.

Important note: The I/O will probably change asynchronously to the program scan, so what you want to do is make a copy of the X, Y, Z, W, P, R values coming into the PLC and compare the current values to the values from the last scan. If they haven’t changed, then update your actual values, otherwise throw them away because they might not be valid. If you have a fast scanning PLC and I/O then you should still be able to keep up with the robot even during a fast move. If you have a slow scan time on your PLC, then you might only get valid stable values when the robot is stopped.

Now what if you want to know what the TCP position is relative to one of your user frames? The robot controller doesn’t seem to give you access to this, but the PLC can at least calculate the X, Y, and Z positions of the TCP in your user frame itself, given the world position and the user frame parameters.

First you need to find the accurate user frame parameters. Under the normal frames screen you can only get one decimal point of accuracy, but you need the full 3 decimal points to have your numbers in the PLC match the user frame position given in the robot. You can find these accurate positions in a variable: use MENU – 0,6 (SYSTEM) – F1 (TYPE) – Variables – $MNUFRAME[1,9] – F2 (DETAIL). The second index in square bracket is the frame number, so $MNUFRAME[1,1] is frame one and $MNUFRAME[1,2] is frame 2. Copy these numbers down exactly.

Here’s the math for calculating the TCP relative to your user frame. All variables are LREAL (which is a 64-bit floating point variable). I don’t know if you can use a regular 32-bit float or not. Result is your TCP in user frame. Point is your point in world frame (from the robot) and Frame is the accurate user frame data you copied from the $MNUFRAME[] variable.


Result.X_mm := Point.X_mm - Frame.X_mm;
Result.Y_mm := Point.Y_mm - Frame.Y_mm;
Result.Z_mm := Point.Z_mm - Frame.Z_mm;

RadiansW := DegreesToRadians(-Frame.W_deg);
CosOfAngleW := COS(RadiansW);
SinOfAngleW := SIN(RadiansW);

RadiansP := DegreesToRadians(-Frame.P_deg);
CosOfAngleP := COS(RadiansP);
SinOfAngleP := SIN(RadiansP);

RadiansR := DegreesToRadians(-Frame.R_deg);
CosOfAngleR := COS(RadiansR);
SinOfAngleR := SIN(RadiansR);

// Fanuc applies rotations WPR as W (around Z), P (around Y), R (around X)
// AROUND Z
temp := Result.X_mm;
Result.X_mm := Result.X_mm * CosOfAngleR - Result.Y_mm * SinOfAngleR;
Result.Y_mm := Result.Y_mm * CosOfAngleR + temp * SinOfAngleR;
// AROUND Y
temp := Result.Z_mm;
Result.Z_mm := Result.Z_mm * CosOfAngleP - Result.X_mm * SinOfAngleP;
Result.X_mm := Result.X_mm * CosOfAngleP + temp * SinOfAngleP;
// AROUND X
temp := Result.Y_mm;
Result.Y_mm := Result.Y_mm * CosOfAngleW - Result.Z_mm * SinOfAngleW;
Result.Z_mm := Result.Z_mm * CosOfAngleW + temp * SinOfAngleW;

Note that DegreesToRadians() is just PI*deg/180.

Run that on your PLC and check that the values in your Result variable match the user frame TCP position reported on the teach pendant.

I haven’t gotten around to calculating the W, P, and R angles of the TCP in user frame yet. Currently I just look at W, P, and R in world frame if I need to know if I’m “pointed at” something. If you get the math to work for W, P, and R, I’d really appreciate if you could share it.
Automation and the Guaranteed Minimum Income

In recent years I’ve been interested in the effects of automation on our economy and our society. Throughout history every advance in technology has brought more wealth, health, and opportunity to pretty much everyone. With every revolution people changed jobs but their lives got significantly better. When farms mechanized, workers moved into the city and got factory jobs, and Henry Ford’s assembly lines made use of this labor to great effect.

Early factories needed labor in great quantities and as industrial processes became more efficient at utilizing labor, the value of human labor rose and the demand kept increasing. So did pay. Factory workers up through the 70’s could afford a nice house to raise a family, a big car, and even a boat or nice vacations. Since the 70’s however, the purchasing power of a factory worker or even a bank teller has been pretty flat. These are two professions that have seen the most advances in automation in the last 30 years, due to industrial robots and automated tellers. If automation makes workers more productive, why aren’t we seeing that translate into purchasing power?

There are two types of technological improvements at work here. A farmer with a tractor is very productive compared to one with a horse and plow. The displaced farm workers who went to the city were given the tools of the industrial revolution: steam engines, motors, pumps, hydraulics, and so forth. These technologies amplified the value of human labor. That’s the first kind of technological improvement. The second kind is the automated teller or the welding robot. The older technology adds value even to the lowest skilled employees, but the new technology is reducing their value and the new jobs require significantly higher skill levels. There’s something about this new revolution that’s just… different. The demand for low skill labor is drying up.

The increasing divide between the “haves” and the “have-nots” has been documented extensively. Some divide is good and promotes the economy and productivity. Too much separation is a recipe for significant problems.

I’m not the only one worrying about this issue, and as I’ve followed it over the last few years I’ve been surprised by the amount of interest in a Guaranteed Minimum Income or some such plan. Basically it involves getting rid of every low-income assistance plan such as social security, welfare, minimum wage laws, etc., and creating a single universal monthly benefit that everyone is entitled to. Some people are talking about a number as high as $24,000 per year per adult. Considering that the 2015 federal poverty level in the US is just below $12,000 for a single adult, you can see that $24,000 per adult isn’t just a trifling amount.

For comparison, a little Googling tells me that the US GDP per capita is around $55,000. Think about that for a second. You’re talking about guaranteeing almost 45% of the productivity output of the country to be distributed evenly across all adults. One presumes you would also provide some extra money per child in a household, but to be fair the “per capita” figure includes kids too. It’s possible. Sure seems a bit crazy though.

Is it practical? Won’t some people choose not to work? Will productivity go down? It turns out that we’ve done some experimenting with this type of program in Canada called MINCOME. The results were generally positive. There was a small drop in hours worked by certain people, mostly new mothers and teenagers. These costs were offset in other areas: “in the period that Mincome was administered, hospital visits dropped 8.5 percent, with fewer incidents of work-related injuries, and fewer emergency room visits from car accidents and domestic abuse.” More teenagers graduated. There was less mental illness.

I’m fiscally conservative, but I’m mostly pragmatic. It’s only my years of exposure to automation, technology and working in factories that makes me ask these questions. Not only do I believe that people should contribute, I believe that people need to contribute for their own happiness and well-being. That’s why I don’t think paying people to sit at home is the ultimate solution.

The elephant in the room is this: as technology improves, a greater proportion of the population will simply be unemployable. There, I said it. I know it’s a disturbing thought. Our society is structured around the opposite of that idea. Men are particularly under pressure to work. The majority of the status afforded to men in our society comes from their earning potential. The social pressure would still be there to work, even as a supplement to a guaranteed minimum income, so we still need to find something for those people to do. Perhaps if we expand the accepted role of men in society then we can fill that need with volunteer work. Maybe.

What’s the right answer? I don’t know. For lack of a better term, the “American Dream” was accessible to anyone if you were willing to work hard and reinvest that effort into yourself. Not everyone did that, but many people created significant fortunes for themselves after starting in the stockroom and working their way up. That security gave people a willingness to take risks and be entrepreneurial. Proponents of the idea say that a minimum income would bring back that innovative edge. Entrepreneurs could try new ideas repeatedly until they found one that worked, and not worry about their family starving. With your basic necessities met, you could start to realize your potential..

I do know that as we continue down this road of increasing automation, we can’t be leaving a greater and greater proportion of the populace without the basic resources they need to survive. Do we expect them to grow their own food? On what land? Do we expect them to do a job that I could program a robot to do, if the robot’s average cost is only $10,000/year? Do you have some valuable job we can retrain them to do? One that pays enough to support a family?

Look, I don’t like the alternatives either, but it’s better than an armed revolt.

Whole Home Energy Monitoring with the Brultech ECM-1240

This Christmas I asked Santa for a Brultech ECM-1240 whole home energy monitoring system, specifically the DUO-100 package. After reviewing various products, I really liked that this one was priced quite reasonably for the hardware, and that they published the communication protocol.

You (or a licensed electrian) install the ECM-1240 at your main electrical panel. Each ECM-1240 has 7 channels. In my case, the first channel on the first unit measures the incoming main line current. For the other 13 channels you are free to choose various circuits from your panel that you want to monitor. You can gang various circuits together into a single channel if you like (all lighting loads, for example). The device uses current transformers on each circuit for the monitoring. These are installed inside the panel. The hot wire coming out of each breaker has to go through a current transformer, so this isn’t a simple plug-in installation; there is wiring to be done.

The company distributes software for the device for free, or you can choose from various 3rd party software. Alternatively you can configure the device to send data to websites.

I’m not a fan of sending my home energy data to someone else’s server. Apart from being a huge privacy concern (it’s pretty easy to see when you’re home, and when you went to bed), I don’t want to pay a monthly fee, and I don’t want to worry about how to get my data from their server if they go out of business or decide to discontinue their product. For those reasons, I installed their software. It’s basically a flash website that I hosted on our Windows Home Server, which is conveniently the computer hooked up to the ECM-1240’s as well.

At first their software worked quite well, but over time it started to show problems. After just less than 2 months of logging, the flash program was so sluggish to load a page that it took over 2 minutes to refresh a screen. Admittedly I was running it on an older PC. Additionally, in that amount of time it had already logged about 680 MB of data. That seemed excessive. It also logged to a SQL Lite database (a single-user file-based database), and unfortunately kept the database file locked all the time. The website would end up locking the database and packets started getting buffered in the logging software until you closed down the website and released the lock.

I decided I’d just write my own software:

Power Cruncher Viewer

I’m a C# developer, so that was my language of choice. If you’re a .NET developer too, I’ll include a link to my source code at the end of this post. Note that this software isn’t commercial quality. It’s semi-configurable (channel names, and so on) but it assumes you have a 14 channel system where the first channel is the main panel input. If your system is different, you’ll have to make some modifications.

These devices I purchased use a serial port for communication, but they give you an RS232 splitter cable so you only have to use up one serial port on your PC. Their software relies on putting the device into an automatic send mode… the device itself chooses when to send packets. If the load changes significantly on one of the circuits, it triggers an immediate packet send. Unfortunately with 2 devices on the same RS232 port, you can sometimes get a collision. Their software deals with this by detecting it and ignoring the data, but I had a sneaking suspicion that once in a rare while, it ended up getting a corrupt packet, and there was at least one point where their software logged an extremely high energy reading, and it didn’t make any sense. Therefore I wrote my software to use a polling mode. It requests data from the first device, waits about 5 seconds, requests it from the other device, waits 5 seconds, and repeats. On average we get one reading about every 10 seconds from each device. Testing seemed to indicate this was about as fast as I could go because there was a reset period after you talked to one device where you had to wait for it to time out before you could address the other one. In retrospect, if you just hooked them up to 2 separate serial ports you could probably poll the data faster.

Next I had to choose how to log the data. I really wanted the data format to be compact, but I still wanted decently small time periods for each “time slice”. I also didn’t want to be locking the file constantly, so I just wanted to be able to write the data for each time slice, and be done with it. I settled on a binary format with fixed length records. Here’s how it works: each day’s data is stored in a separate file, so the data for April 1st is stored in a file called 2015-04-01.dat. The device generates values in watt-seconds. I calculated that at a maximum current of 200A (100A panel x 2 legs) x 120V, then in a 10 second time slice I should log a maximum of 240,000 watt-seconds. A 20-bit number (2.5 bytes) can store a maximum value of 1,048,575. I didn’t want to go smaller than half-byte increments. So, 14 channels at 2.5 bytes per channel gave me 35 bytes for each 10 second time slice, and since the devices generate voltage I figured I’d log the voltage as a 36’s byte just to make it an even number. Using those numbers, running 24 hours a day for 365 days a year, this will use up under 110 MB/year. Not bad. A flat binary file like this is also fast for data access. The data is small, and seeking a time slice can be done in O(1) time. After you find the first time slice you just keep reading bytes sequentially until you get to the end of the file or your last time slice. Hopefully no more 2 minute load times.

I broke up my application into multiple programs. The first is a utility program called Uploader.exe. This is a command line program that reads the data from a device and just spits it out to the screen. Useful for testing if it works.

The second is called Logger.exe and it does just that. It uses Uploader.exe to read values from the two ECM-1240 units at 5 second offsets and writes the data to XML files into a PacketLog folder. Each file has the timestamp of when it was read, and the device number to indicate which device it came from.

The third program is called PacketProcessor.exe. This program monitors the PacketLog folder and waits until it has at least one packet from each device after the end of the current time slice it’s trying to build. If it does, it calculates the values for the current time slice and appends it to the end of the current day’s data file. It then deletes any unnecessary packets from the PacketLog folder (it keeps at most one packet from each device before the end of the most recently written time slice).

To host Logger.exe and PacketProcessor.exe, I used nssm a.k.a. “the Non-Sucking Service Manager”. It’s a small command line program you can use to run another command line program as a service. Very handy.

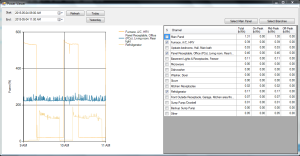
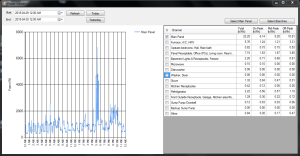
The fourth program is called Viewer.exe. It’s the graphical interface for viewing the power data. Here’s a screenshot of data from one day (just the main panel power, click on it to make it bigger):

Main Panel Power over one day

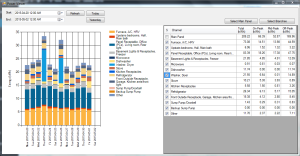
That’s a rather typical day. The big spike around 5 pm is the oven, and you can see the typical TV-watching time is after 8 pm once the kids are in bed. On the right you can see it breaks out the power usage in kWh for each channel, and in our area we have time-of-use billing, and this actually breaks the power usage out into off-peak, mid-peak, and on-peak amounts.

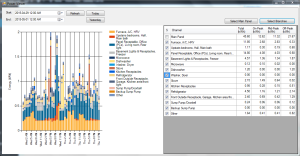
The viewer program uses a line graph for all time periods under 24 hours, but switches to an hourly bar graph for periods longer than that. Here is a 48-hour time period, and I’ve changed from just the Main Panel to all the branch circuit channels instead:

Branch circuit power over 48 hours

If you ask for a time period of more than a week it switches into daily bars:

Branch circuit power by day

Pulling up two weeks of data like that was actually very fast, just a few seconds.

One final feature I added was email alerts. One of the channels monitors just my backup sump pump circuit. If it ever turns on, that’s because my main sump pump has failed, and I want to know. Through a configuration file, I configured an alarm to email me if that circuit ever records more than 5W of power in a 10 second time slice. I did a little test and it works (it does require that you have a Gmail account though).

Here’s the source code, if you’re interested:

As always, feel free to email me if you have questions or comments.

Announcing: Patterns of Ladder Logic Programming

You may have noticed I recently added a new section to this site: Patterns of Ladder Logic Programming. My goal, as usual, is to try to help new ladder logic programmers come up to speed faster and without all the trial and error I had to go through.

The new Patterns section is an attempt to distill ladder logic programs into their component parts. I assume the reader already knows the basic elements of ladder logic programming, such as contacts, coils, timers, counters, and one-shots. The patterns describe ways of combining these elements into larger patterns that you’re likely to see when you look through real programs. In my experience, you can program 80% of the machines out there by combining these patterns in applicable ways.

The Patterns section isn’t complete yet, but I will be adding to it slowly over time. If you think of a pattern that’s blatantly missing, please send me a note so I can include it.

Upgrading your TwinCAT 3 Version

Beckhoff releases new versions of TwinCAT 3 fairly often, and especially since this is a new platform you probably want to stay on top of their new updates for improved stability and new features. Here are some hard-won lessons I wanted to share with you about how to upgrade your production system to the latest TwinCAT 3 release:

Have a Test System

You should definitely have an offline test system for many good reasons. This test system should have the same operating system version as your production system and should ideally be the same hardware, though I realize that’s not always feasible. It could just be an old desktop PC you have sitting around, but that’s better than nothing. TwinCAT 3 is free for non-production use so you have no excuse for not having an offline test system.

Test your upgrade on the Test System First!

Never try upgrading your production system without running through a dry-run on your test system first. Get a copy of the latest TwinCAT solution from your production machine and get it running on your test system. It doesn’t matter if you don’t have I/O attached because the runtime will work just fine anyway. After your perform the upgrade procedure on your offline test machine, make sure you do a thorough test, including a reboot.

Follow These Steps

  1. Stop the machine and make it safe
  2. Put the runtime into Config mode
  3. Uninstall the old version of TwinCAT 3
  4. Also uninstall the old version of the Beckhoff Real-time Ethernet PnP Drivers
  5. Reboot
  6. Install the new version of TwinCAT 3
  7. Reboot
  8. Open the TwinCAT 3 solution
  9. Re-install any custom libraries, if you have any (optional)
  10. Go to the tool for configuring Real-time Ethernet devices, and install the new driver on your EtherCAT cards
  11. Re-link your EtherCAT master to your EtherCAT adapter under I/O, just in case
  12. Build each PLC project (individually, don’t use Rebuild All because it sometimes ignores errors)
  13. Check that you didn’t lose any I/O mapping
  14. Activate boot project on each PLC project
  15. Check under System that it’s configured to start in Run mode (if that’s what you want)
  16. Activate configuration and restart in run mode
  17. Test by doing a reboot

Upgrading the Real-time Ethernet drivers is critical. We were experiencing cases where the EtherCAT bus would just cut out on us, but only on one machine. All of our machines were upgraded to the same version, so we initially thought it must be a hardware issue. It turned out that we weren’t upgrading the Real-time Ethernet driver when we upgraded TwinCAT 3 versions, so this machine had an old version of the driver loaded, and all the other machines had a newer version. After upgrading the driver, the problem went away, so upgrading the driver is a critical step.

If you find that you did lose your I/O mapping, make sure you’ve built all your PLC projects (which generates a TMC file) and then close TwinCAT 3 XAE down and revert your .tsproj (TwinCAT solution project) file back to the original state. Then start again at the step where you open the TwinCAT 3 solution. Now you should find that your I/O mapping is back. That’s because the inputs and outputs of each PLC project are compiled into the TMC file and TwinCAT 3’s system manager links I/O against that. If the file doesn’t exist (or they changed the format during the upgrade) then it’ll just delete the links. However, the links still exist in the original .tsproj file, so creating the TMC file and then reverting the .tsproj file will put everything back to a happy state. This is also a useful trick when you’re moving the project to a new PC and you didn’t bring the .tmc files along for the ride (because they’re quite large).

Edit: Since writing this article, I’ve added a TwinCAT 3 Tutorial to this site as well.

The TwinCAT 3 Review Revisited

I reviewed TwinCAT 3 in February of 2013 and it was a mixed bag. I lauded the amazing performance but warned about the reliability problems. I think it’s time to revisit the topic.

Things have improved greatly. When I wrote that review we had 2 production systems running TwinCAT 3 (the 32-bit version). We’re now up to 5 production systems with another on the way, all running version 3.1.4016.5 (which is a 64-bit version). The product has been more stable with each release. First we tried switching to a Beckhoff industrial PC, but we still experienced two blue screen crashes. We’ve then turned off anti-virus and disabled automatic windows updates. So far I haven’t seen another blue screen on that system, for about two months.

Manually installing windows updates isn’t a big deal, but it’s unfortunate to be running a PC-based control system with no anti-virus. Our industrial PCs are blocked from going online, and each one is behind a firewall that separates it from our corporate network, but it’s still a risk I don’t want to take. Industrial Control vendors continually tell us their products aren’t supported if you run anti-virus, and I don’t see how anyone can make statements like that in this day and age.

The performance of the runtime (ladder logic) and EtherCAT I/O is still absolutely amazing.

While the IDE is much better than the TwinCAT 2 system, the editor is still quite slow (even on a Core-i7 with a solid state drive).

The Scope is now integrated right into the IDE, and I can’t give that tool enough accolades. I recently had to use Rockwell’s integrated scope for ControlLogix 5000 and it’s pitiful in comparison to the TwinCAT 3 scope.

The TwinSAFE safety PLC editor is light years beyond the TwinCAT 2 editor, but it’s still clunky. It particularly sucks when you install a new revision of TwinCAT 3 and it has to upgrade the safety project to whatever new file format it has. We recently did this, then had to add a new 4-input safety card to the design, and it wouldn’t build the safety project because of a collision on the connection ID. It took us a couple hours of fiddling and we eventually had to manually set the connection ID to a valid value to get it to work. On another occasion, after a version upgrade, I had to go in and add missing lines in the safety program save file because it didn’t seem to upgrade the file format properly (I did this by comparing the save file to another one created in the new version).

The process of upgrading to a new TwinCAT 3 version often involves subtle problems. The rather infamous 3.1.4013 version actually broke the persistent variable feature, so if you restarted your controller, all the persistent variables would be lost. They quickly released a fix, but not before we experienced a bit of pain when I tried it on one of our systems. I’m really stunned that a bug this big and this obvious could actually be released. It’s almost as if Beckhoff doesn’t have a dedicated software testing department performing regression tests before new versions are released, but certainly nobody would develop commercial software like this without a software testing department, would they? That’s a frightening thought.

I ended my previous review by saying I couldn’t recommend TwinCAT 3 at this time. I’m prepared to change my tune a bit. I think TwinCAT 3 is now solid enough for a production environment, but I caution that it’s still a little rough around the edges.

Edit: Note that I’ve since added a TwinCAT 3 Tutorial section to this site.

The Ladder Logic/Motion Controller Impedance Mismatch

Motion control is pretty complicated.

There’s been something really bothering me about the “integrated” motion control you find in PLCs these days (notably Allen-Bradley ControlLogix and Beckhoff TwinCAT). Don’t get me wrong, they’re certainly integrated far better than stand-alone motion controllers. Still, it just doesn’t “feel” right when you’re programming motion control from ladder logic.

When I’m programming a cylinder motion in ladder logic, I would typically use a five-rung logic block for each motion (extend/retract). One of the 5 bits is a “command” bit. This is a bit that means “do such-and-such motion now”. Importantly, if I turn that bit off, it means “stop now!” This works well for a cylinder with a valve controlling it because when I turn off power to that valve, the cylinder will stop trying to move. It would be nice if integrated motion was this simple.

It’s interesting to note that manual moves (a.k.a. “jogging”) are usually this simple. You drop a function block on a rung, give it a speed and direction, and when you execute it based on a push-button, the axis jogs in that direction, and when the push-button turns off, it stops jogging. Unfortunately none of the other features are that simple.

All other moves start motion with one function block and require you to stop it with another. The reason it works like this is because motion controllers also support blended moves. That is, I can first start a move to position (5,3) and after it’s moving there I can queue a second move to position (10,1) and it will guide the axes through a curved geometry that takes it arbitrarily close to my first point (based on parameters I give it) and then continue on to the second point without stopping. In fact you can program arbitrarily complex paths and the motion controller will perform them flawlessly. Unfortunately this means that 90% of the motion control logic out there is much more complex than it needs to be.

Aside: in object-oriented programming, such as in Java or .NET, it’s pretty normal to have to interface with a relational database such as MySQL or Microsoft SQL Server. However, when you try to mesh the two worlds of object-oriented programming and relational databases, you typically run into insidious little problems. Programmers call this the Object-relational impedance mismatch. I’m sure that if you added it up, literally billions of dollars have been spent trying to overcome these issues.

My point is that there is a similar Ladder logic-motion control impedance mismatch. The vast majority of PLC-based motion control is simple point-to-point motion. In that case, the ideal interface from ladder would be a single instance of a “go-to” function block with the following parameters:

  • Target Position (X, Y…)
  • Max Velocity
  • Acceleration
  • Deceleration
  • Acceleration Jerk
  • Deceleration Jerk

When the rung-in-condition goes true on this block, the motion control system moves to the target position with the given parameters, and when the rung-in-condition goes false, it stops. Furthermore, we should be able to change any of those parameters in real-time, and the motion controller should do its best to adjust the trajectory and dynamics to keep up. That would be all you need for most applications.

The remaining applications are cases where you need more complex geometries. Typically this is with multi-axis systems where you want to move through a series of intermediate points without stopping, or you want to follow a curved path through 2D or 3D-space. In my opinion, the ideal solution would be a combination of a path editor (where you use an editing tool to define a path, and it’s stored in an array of structures in the PLC) and a “follow path” function block with the following parameters:

  • Path
  • Path Tolerance

When the rung-in-condition is true, it moves forward along that path, and when it turns off, it stops. You could even add a BOOL parameter called Reverse which makes it go backwards along the path. The second parameter, “Path Tolerance” would limit how far off the path it can be before you get a motion error. I think this parameter is a good idea because it (a) allows you to initiate the instruction as long as your position is anywhere along that path, and (b) makes sure you’re not going to initiate some wild move as it tries to get to the first point.

A neat additional function block would be a way to calculate the nearest point on a path from a given position, so you could recover by jogging onto a path and continue on the path after a fault.

Obviously there needs to be a way for the PLC to generate or edit paths dynamically, but that’s hardly a big deal.

Anyway, these are my ideas. For now we’re stuck with this clunky way of writing motion control logic. Hopefully someone’s listening to us poor saps in the trenches! 🙂

Ladder Logic running on an Arduino UNO

Happy Canada Day!

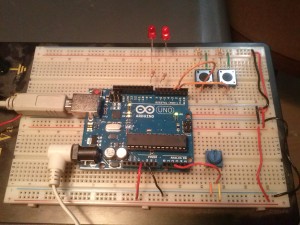
Some of you may wonder if I’d fallen off the face of the Earth, but the truth is life just gets busy from time to time. Just for interest’s sake, here’s my latest fun project: an Arduino UNO running ladder logic!

Ladder Logic on a UNO

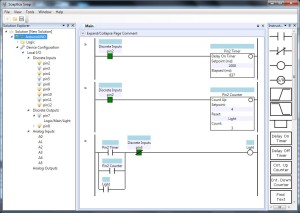
You may remember I wrote a ladder logic editor about 5 or so years ago called SoapBox Snap. It only had the ability to run the ladder logic in a “soft” runtime (on the PC itself). This is an upgrade for SoapBox Snap so that it can download the ladder logic to an Arduino and even do online debugging and force I/O:

Arduino UNO Ladder

I haven’t released the new version yet, but it’s very close (like a few days away probably).

Edit: I’ve now released it and here is a complete tutorial on programming an Arduino in Ladder Logic using SoapBox Snap.

On Media Boxes in the Living Room

I’ve mentioned before that we first had a TiVo, and after getting an HDTV (TiVo doesn’t support an HD model compatible with Canadian cable TV) we got a Boxee Box and dropped our cable TV subscription. Basically we decided to stream all our TV from the internet. Now that Boxee got bought out and stopped updating the firmware for its rather outdated hardware we decided to move on. I think a lot of people are considering the leap away from cable or satellite and into streaming their TV and movies from the internet, so let me share our experiences.

First of all, I’m not convinced that a smart TV or embedded device like the Boxee Box or Roku is the answer. The Boxee Box was great for streaming content from other PCs in the house, but not for streaming stuff from online. These embedded set-top type devices, whether they’re built into the TV or not, suffer from two major drawbacks: one is that they’re usually underpowered for the price you pay, and two is that the software is typically some kind of highly customized embedded Linux with some custom user interface software built on top of it. On the Boxee Box, the web browser always seemed to be a bit slow, flaky, and the flash was typically out of date compared to what the online TV streaming sites were using. Our relatives recently purchased a brand new smart TV, and the web browser didn’t seem to support the latest flash that they needed to visit some site. Given the premium you pay for smart TV features, that seems a bit hard to swallow. Flashing the firmware was the next step, but I’m not sure how that went.

Given that background, we decided to take the plunge and just buy a PC and hook it up to the TV, then get a wireless keyboard and mouse combination. You can get a pretty good PC (Core i5) on sale for less than $500, and I’m pretty sure that even a $300 bargain model would probably do everything you wanted, and that’s less than the premium you might pay for a smart TV.

We couldn’t be happier with the new PC solution. The Windows software just stays up-to-date. It’s fast (much faster than any other set-top-box hardware you’ll see today), the interface is familiar, and all your hard-won Windows knowledge will come in handy if you have any problems. Netflix and other Hulu-like services work great. I also like that the kids can have their own login that’s limited by the parental controls feature of Windows (which I’d never used before, but is actually quite advanced).

I know one issue is where to locate the PC. We actually already had a place in the entertainment cabinet where a full desktop tower could fit, so it wasn’t a big deal, but if that’s an issue for you, there are other smaller (more expensive) options like the Zotac ZBox out there, which is just a full blown PC in a small form factor. I have also seen a wireless HDMI device (it works line-of-site) so you could hook it up to a laptop that you have on a table beside the couch (the TV would show up as a second monitor). Another issue is having the wireless keyboard and mouse out on the coffee table. That’s not a big deal if you have somewhere handy to stow it when not in use. Having a full keyboard certainly makes certain things a lot easier (searching for content, entering passwords, etc.).

One final caveat – the one bit of content that’s very hard to find online is sports. If you’re really into sports (we’re not) then you’ll need to keep some kind of paid TV subscription. That’s just the way it is.

Plus you get the benefit of a full-blown PC handy in your living room. Overall I think it’s the best solution we have right now, and it’s what I’d recommend if you’re looking to take the plunge.